DIY: How to make your own holiday cards
- kendrakaywilson

- Dec 10, 2019
- 3 min read
Nothing makes me happier than opening an envelope addressed to me (unless it's a bill, of course). The holidays are the perfect time to send your loved ones a sweet message, especially a personalized one! If it's impossible to get your family together to take a perfect picture for your card, think about making one with custom art.
It's cheap, easy, and fun! It's a great craft to do with your kids, partner, or friends. You only need a few supplies that you can get at any craft store. Here's what you'll need:

- Pencil
- Paper
- Block Printing Ink (any color you'd like!)
- Cards & Envelopes (any color you'd like!)
Step 1:
Get creative! This is the most important step, you need to choose a design for your card. I suggest sketching out your ideas on paper before committing to a design. If you need inspiration, I suggest browsing Pinterest. If this is your first time printmaking, maybe start with a simple holiday design. If you’re ready to take on more, add some text. This is your chance to make your cards as customized as possible, be unique.
Step 2:
Once you’ve finished your design, you need to get it onto your slab of linoleum. To transfer your sketch onto your linoleum, place the transfer paper on top of your drawing on paper. You'll be able to see your design through the thin sheet of paper. Next, trace what you see onto the transfer paper. Once that's done, you can place the transfer paper face down on the linoleum, and once again trace the sketch. This will press your design into the linoleum! Don’t be alarmed that your design now looks backwards on your linoleum, once it is stamped it’ll look like your original design.
If you're confident or don’t have transfer paper, you can draw your design straight onto the linoleum. This will be easiest if you're doing a simple drawing, or something symmetrical that you don't mind printing backwards. If you're wanting text, keep in mind that you'll need to draw the text backwards. It's possible, but I recommend practicing on paper! Good luck, I believe in you.
For your convenience, I'll provide two designs below. Make sure to use the original if you plan on transferring, and the backwards version if you plan on tracing straight onto the linoleum.


Step 3:
Time to carve! Now's the fun part. Using your lino cutter, you're going to cut away all of the negative space. This is everywhere outside of your design, do not cut out whatever you want printed. Your cutter should come with multiple knife tips, feel free to mix up the width of your tip to best cut out the details you need. Simply slide your cutter into the linoleum to scrape up the negative space. Your blade should stay almost parallel to the slab. Below you can see what should be cut away to get the desired design on your stamp. The gridded area is what would be cut away, and the black area would be printed. The next picture is what your stamp should look like when you're done, the printing area is raised, while the excess is cut down where the ink can't reach it. For more information on cutting, here’s a great informational video.


Step 4:
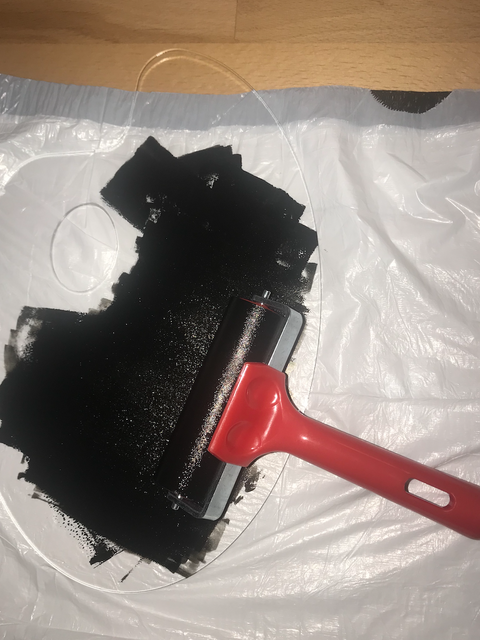
Printing time! Squeeze out a nickel size dollop of ink onto your acrylic palette. Use your roller to thin it out into an even thickness. Make sure your roller is completely covered in a thin layer of ink. If there is too much ink on your roller, your stamp will bleed outside of the edges of your design on your paper. Next, roll your ink onto your stamp evenly, making sure not to get any ink outside of your design. Then, place your stamp face down on your card where you'd like. If you’re planning to fold your paper into a card, make sure to stamp it on the outside, right side of the paper. Press down hard and evenly on your stamp for 10-20 seconds. Then, reveal your design! If there is any extra ink where you don't want it, just shave away more of the linoleum. Once you're satisfied, print as many as you'd like, adding more ink when needed!


Step 5:

After letting your cards dry for an hour or two, you can go ahead and fold and write your message inside. Then it's time to mail them! Bring back the magic of hand-delivered mail. Your loved ones, teachers, coworkers, or anyone in your life will appreciate the time and effort you put into these special holiday cards.
Tip: for an extra personalized touch, make a mini stamp to put on the outside of your envelope!
I hope you enjoy this craft and have a happy holiday!


Comments